STEP BY STEP PROCESS : Stamped concrete

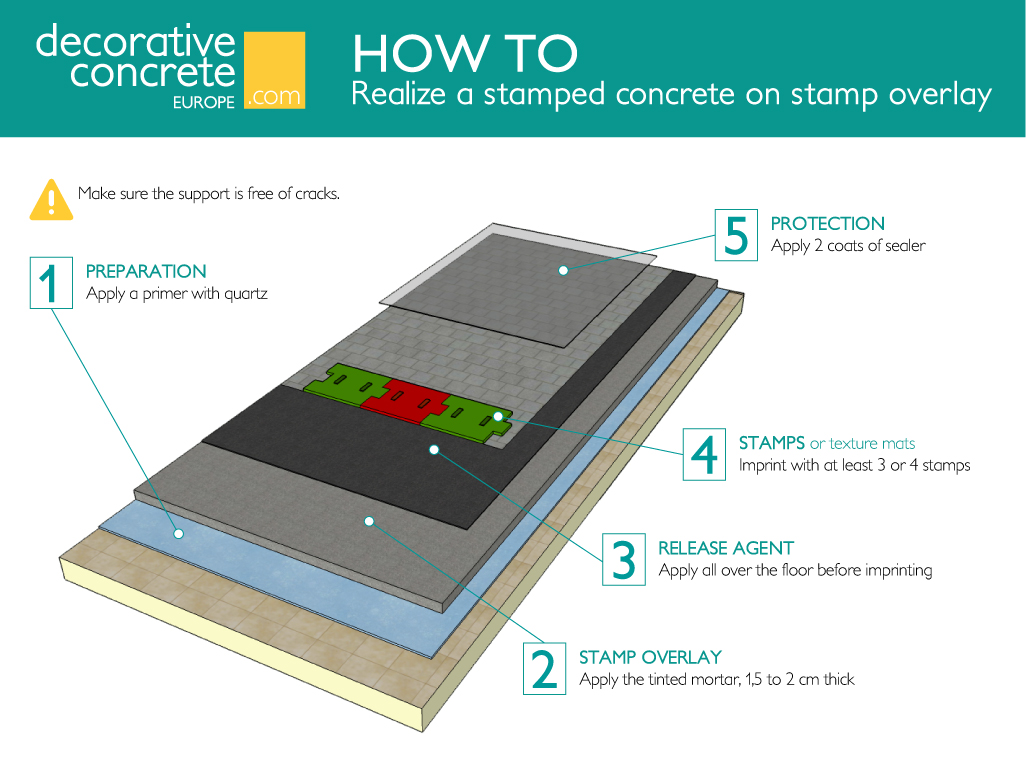
Step 1 : Preparation
A stamped overlay will be durable and easy to maintain if applied properly. In order to adhere successfully, you'll need to prepare the existing surface. The surface must be resistant, clean, hard without cracks. Remove all dust and other substances of old coating who could damage the grip of the product (paint, oil, grease, fluorescence, GLU, sealers...)
Apply Masters Prim Quartz as a primer.
Warning: If you have some little cracks, you can repair it with an Epoxy Resin and insert a fiber mesh into this primer.
Step 2 : Application
To prepare the mix, take a special bucket for mixing and put first 5 liters water.
Then, add gradually Masters Stamp Overlay powder, pigment ant adjuvant. Mix with a professional mixer with a slow speed (<600rpm) for 2 minutes.
Once mixed, apply the product with a trowel and if necessary, adjust the thicknesses with a gauge rake. You must have a minimum of 1cm for light stamps like skins or textures, and 2 cm for classics stamps more structured. Once the product in place, smooth carefully with a trowel to have a perfect finish.
Step 3 : Apply release agent
Right before you stamp, apply Masters Antique Release Agent with a dry tampico brush in a flicking motion. Avoid too much buildup, which could interfere with the imprint texture, especially lighter textures.
Powder release agent serve two important purposes: it imparts subtle color contrast while acting as a bond breaker to prevent the stamping mats or skins from sticking to the concrete and disturbing the imprint texture.
Step 4 : Stamping
Before you begin stamping, check to see that the concrete has reached the right stage of plasticity. If you begin stamping too soon, the concrete won't be firm enough to support the weight of workers or hold a well-defined imprint. If you start stamping too late, not only will stamping require more effort, you'll produce little or no texture with the stamps, especially as you reach the end of the job. Press your fingers into the concrete surface at several locations on the slab.
Start stamping by placing the stamps in the same sequence that you placed and finished the concrete. The stamping crew should complete the first row of stamps before moving on to the next one. Impress the stamps into the surface by walking on the tools, possibly followed by a light tamping.
It could be necessary to do some detailing with a hand chisel, roller, or texture skin to remove displaced cement paste that comes up through the joints between stamps, to fix any blurred pattern lines, and to correct grout joints where the stamp wasn't tamped down with sufficient pressure.
Step 5 : Protection
Wash off the residual release agent-a minimum of one day (and in some cases two or three days later, depending on weather conditions).
The final step is to apply sealer to the concrete. To obtain maximum adhesion and long-term durability, be sure to apply the sealer to a clean, dry surface. One of the most effective techniques for applying sealer is to combine both spraying and rolling, especially when the stamped pattern has deep grout lines. Be careful not to apply the sealer too heavily, which could trap moisture in the slab.
To avoid a slippery effect when the surface is wet, it is possible to incorporate non-slip powder to the first coat of sealer.
Tips & advices
- Instead of using a powder release agent, you can choose a transparent and liquid release agent.
- Don’t apply to much release agent, especially with lighter textures.
- The powder release is composed of very fine airborne dust particulates. During windy day, you must be particularly attentive to do not stain nearly walls or buildings.
- Protect yourself in wearing dust mask to prevent inhalation.
- Be sure that the person walking on and moving the stamps is wearing clean boots or work shoes, free of any pebbles, mud, or other debris.
- Avoid hot or windy days.
- Avoid pattern repetition, especially with patterns that mimic natural materials such as stone or slate. A random composition will look much more realistic.